Tech Stuff - Working with BGAs
Dates from 2002. This was bleeding edge stuff at the time. Tools and technology have moved on a lot since. But it's always good to be reminded of a mis-spent youth. So we leave it here.
Our first attempts with BGAs (Ball Grid Arrays) in a layout were a disaster. We always use an auto-router (ORCAD in our case). Yeah the first one takes 3 - 4 days to set the board up but then about 2 hours even for pretty complex boards on very slow PCs (this was 2002 remember).
Most auto-routers we've seen hate BGAs. But they try hard and then leave maybe 3 routes undone but that's 'cos they were impossible - and for the human being even more impossible. The trick is to do a semi-manual (or even a semi-automatic) fanout first and lock all your vias (essentialy you let the BGAs breathe). But we are getting ahead of ourselves.
Health Warning
This stuff worked for us. It may not work for you.
Our Board Stats
We are using the following norms:
- Normal track width = 6m (0.15mm)
- All Track spacing = 5m (0.12mm) (track-to-track, track-to-via etc.)
- Normal Via = 25m (0.64mm) hole = 10m (0.25mm) clearance on planes = 33m (0.83mm)
- Mini-BGA via = 22m (0.55mm) hole = 10m (0.25mm) clearance on planes = 28m (0.70mm)
Get the data
We started from a careful reading of some manufacturers 'packaging' or 'layout' application notes on BGAs (or whatever they call them). This reading stuff is totally out of character for us and shows just how serious a problem this really was. We even tried the ORCAD web site and came up with squat (Ed: written in 2002 doubtless it has improved since).
Credit where it's due: Both TI and National Semiconductor had great Application Notes on BGAs (mostly for 40/48 pin devices but the principles are exactly the same for whopping big 357 pin PowerPC BGAs or mini-BGAs).
We used three types of BGAs:
- Big 'uns (1.27mm ball centers). Use normal Vias.
- Small 'uns (0.80mm ball centers). Use Mini-BGA Vias.
- Strange 'uns (0.75mm ball centers). Use Mini-BGA Vias.
Dog-Bones and other Phenomena
You look at this stuff and think it's a snap - just place the via under the pad and you are done - VERY, VERY WRONG. Apparently with normal vias (25m (0.64mm) with 10m (0.15mm) holes) most of the solder disappears down the via hole which is pretty unfriendly. But maybe not too surprising. If you think about it.
Note: You can use the via-in-pad technique if you have access to micro-vias (which have 4 or 6m holes) but is very expensive and most 'common or garden' type PCB manufacturers don't have the technology (in 2002).
Now to get the normal clearances when working in the middle of a BGA you can rarely slap the via in a gap between balls. Instead you place it slighty to one side (so only some of the solder goes down the hole!!) which gives a shape that looks like a 'dog-bone' (if you are drunk or a long way off or preferably both!). You can force ORCAD to do this automatically by setting the max fanout distance to 50% of the ball-to-ball center.
So the secret is..
What we do now is this (remember we use ORCAD)
- Auto-fanout of power and GND only (click the 'use free vias' option in ORCAD) - it does a reasonable job but you may want to clean up a little afterwards.
- Manually fanout all remaining signals and LOCK the VIA at the BALL end. The other end does not matter - let the auto-router have its fun.
Examples
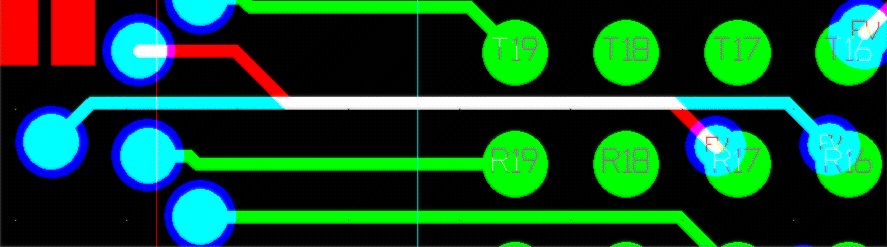
Big BGA
Manual Fanout of a Big BGA (1.27mm centers). Click on image for a bigger one.
Notes:
- The Vias at R17 and R16 are both marked FV (Free/Fixed/locked in ORCAD speak) which means the auto-router cannot rip 'em up.
- R18 is a 'no connect' but we could have gotten it out as a surface run.
Mini-BGA
Fanout of a mini-BGA
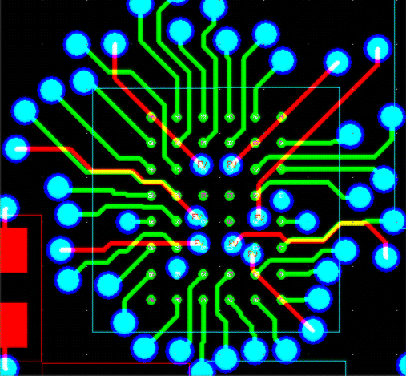
Notes:
- All the internal Vias (in this case mini-vias) are marked FV (Free/Fixed/locked in ORCAD speak) which means the auto-router cannot rip 'em up.
- The rest looks a bit like a demented spider.
Problems, comments, suggestions, corrections (including broken links) or something to add? Please take the time from a busy life to 'mail us' (at top of screen), the webmaster (below) or info-support at zytrax. You will have a warm inner glow for the rest of the day.